2024: A Slat-tastic Start! DIY Delights in Kaitlyn's Room Makeover – How we NAILED the Perfect Feature Wall!
- Trisha McKinney

- Jan 2, 2024
- 4 min read
Updated: Mar 26, 2024
Please note that some of the links in this post are affiliate links. This means that if you click on one of these links and make a purchase, I may earn a small commission at no extra cost to you. I only recommend products or services that I use and believe will add value to my readers. Your support through these purchases helps me keep this blog running and provide valuable content to you.

Hey there, party people! Can we get a drumroll for the fabulous entrance of 2024? New Year, new resolutions, and for me, a whole bunch of wild DIY adventures! We've been on a mission to turn our daughter Kaitlyn's room into the ultimate haven, and we're rounding the corner! Over the weekend, Skott and I took on Kaitlyn's bedroom's feature wall, and guess what? We nailed it {literally and figuratively} – just in time to kick off the year in style. Talk about setting goals and achieving them! Virtual high-five, anyone?
So, the whole Kaitlyn's room glow-up started with a splash of paint several months back. I went for HGTV Sherwin Williams Bohemian Lace – the same white magic we used in our entryway project. We stuck to a neutral palette – white, beige, and light wood other than the one wall we kept in chalkboard paint because Kaitlyn and her friends can't get enough of scribbling messages and showcasing their artistic flair on it every time they are over.


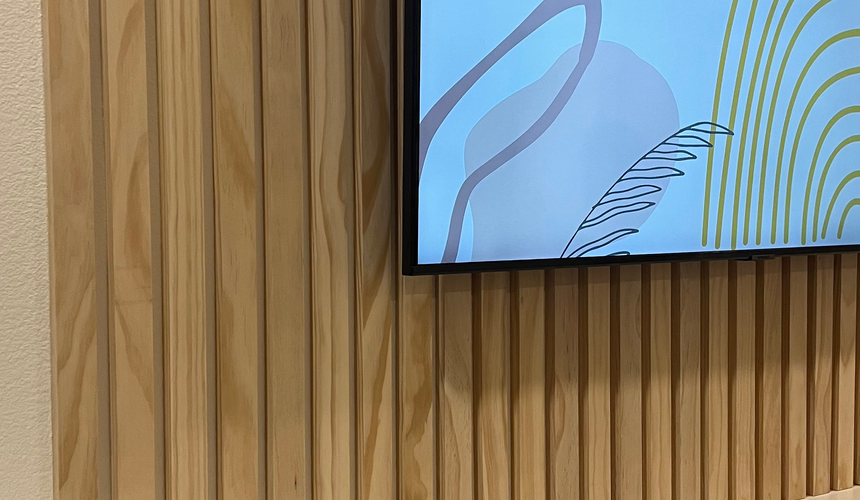
Skott busted out his handy skills and installed some floating cabinets for Kaitlyn's folded clothing around the same time I painted her room. These are technically floating television cabinets but she's using them as a {fashion-forward or make-shift whatever way you want to look at it} dresser. Skott did a reinstall of them over the weekend, long story short we originally installed them upside down {by design but it wasn't working out as expected}, so that was on his checklist for this project along with the installation of the TV mount and movement of the outlet.
Now, onto the weekend masterpiece! The installation of the slat wall above the floating cabinets and the installation of the TV that Kaitlyn scored for Christmas {she must have been on Santa's nice list}. We did look into purchasing the prefab slat walls and quickly realized we could do this ourselves for a fraction of the price {$188 vs $1,155}. Board shopping at Lowe's was a whole adventure – cleared one out and had to raid another but we finally got the thirty-three pine boards we needed and we were ready to roll.


Here's how we arrived at 33 boards; we were installing them in a six-foot space, the boards are 1.5" and the space in between is .75" (one board flipped on its side) for a total of 2.25". We divided 72" (6 feet) by 2.25" and arrived at 32 boards and got one more for good measure (which we ended up needing). *TIP: always read the true dimensions when purchasing any cut wood as the dimensions are not always a "true" measurement. As an example we purchased 1"x2"x6' unfinished pine boards but the actual measurements are .75"x1.5"x6'.
With all the prep work done {wood conditioning and staining}, it was board install time! I drew a straight line on the wall using a long level {I contemplated using the laser level but that would've taken more time to set up and I only needed two lines}.
Then I started sticking those bad boys on with liquid nails and a nail gun. Simple, but doing it solo was a bit like a one-person circus act. Thankfully, Skott joined the circus, and we tag-teamed that wall like pros. After all the boards were in place, I filled the holes with Minwax wood putty and sanded the wood putty down after two hours.
For the spacing between each board, I flipped a scrap piece of primed pine {same dimensions} we used for another project on its side and used it as our guide for even and consistent spacing.


Drumroll, please! The result? A jaw-dropping slat wall that oozes texture and warmth, perfectly harmonizing with the room's vibe. We're over the moon with how it turned out and can't wait to sprinkle more magic in Kaitlyn's room.


Here's to a new year, full of creative sparks and comfy hideaways. Got a DIY adventure up your sleeve? Spill the beans in the comments below! Happy DIYing, and cheers to a rockin' New Year!
Our Supply List:
1 - Liquid Nails
1 - Brad Nailer
1 - 48" Level
1 - Sanding Block
1 - Caulk Gun
If you decided to tackle this DIY or have tackled this project before we'd love to see your masterpieces, share them with us and we'll feature them on our blog and on our social accounts {and give credit of course}.
Next up for Kaitlyn's room following along with us on Instagram and here on the blog:
Remove old dresser
Hang art
Build a floating nightstand
Decide on makeup vanity and mirror
Add some greenery


Comments